Wednesday, August 14, 2013

Islamic bowl reconstruction

The Islamic bowl was difficult to reconstruct. It had many issues with it: large gaps, worn or broken edges, and laminated pieces. 

Top: Front of bowl, with gray areas indicating plaster; Bottom left: Back of bowl, with grey areas indicating plaster; Bottom right: pieces after disassembly.

I started with the easy part, the rim, and worked my way inward. The rim was mainly intact, but even so, there were weak joins and unstable sections. I glued each section together, placing the sections in a box of glass beads, which acted like a sandbox, to prop the pieces up. While the Paraloid B-72 dries, you want the join to be horizontal so that gravity helps keep the pieces in place. I then mounded up tissue for a support when I put the rim sections together.

Left: sections of the rim standing in glass beads; Right: the completed rim.

I put on as many pieces as possible, but then it became hard to place the pieces exactly. I then switched to gluing the small slivers together to create larger pieces. The center is mainly intact, but there are only a few places where a sherd touched both rim and center, and none of those had good join edges. 

Small sherds grouped into larger pieces, drying against a weight.

Claudia called Stephen Koob, a ceramics conservator at the Freer who has written books and articles on ceramic reconstruction methods. He said that he has seen a Seljuk bowl with laminated pieces, though not as bad as mine. It could be as issue with a particular clay or firing. He suggested using a synthetic material called Flügger to gap fill. Flügger is like plaster, but it is more flexible and stays workable for longer. It is used more in Europe than in the States, though it started to be used fairly recently.

To cast the bowl properly, all the joins had to be perfect and the angle of the sherds correct. I decided the best way to do this was to break up the rim into six sections and fix each before putting them back together. I used acetone to dissolve the worst rim joins, then I used a hairdryer to heat up the thermoplastic adhesive on each join to manipulate the pieces back into shape. I also heated and fixed the joins on the smaller interior pieces.

I made a new support for the bowl out of carved foam, cotton, and tissue. I used a razor and scalpels to carve out the general shape of the bowl from the pieces of thick foam. I cut a large depression in the middle so that the top of the base was level with the sides of the bowl. This was padded with cotton, then a sheet of tissue was placed over top.

Carving the foam.

I nestled the pieces into the support and pinned them in place. The central section was quite stable, but it took some work to get the rest of the ceramic to fit. I left off the top pieces of laminated sherds. When they lay over a back section, I cannot put the pins in place. The first time I tried to put all the rim and back pieces in, I was left with a centimeter-wide gap which I physically could not close. I took the pieces all off, padded the support again to change the angle of the sides slightly, then tried again. This time, I was able to close the gap and get all the pieces to fit. Although it is still not exact, the pinned pieces looked good.

Top: First attempt, with a large gap in the rim on the right; Bottom: Pieces pinned into the support.

Saturday, August 3, 2013

Parthian Vessel Joining and Filling

After desalination and gentle cleaning of the Parthian vessel, the potsherd edges were sealed with a thin layer of a 10% solution of Paraloid B-72 in acetone. This is to prevent the stronger adhesive used to hold the pieces together from getting in the porous ceramic, and it helps remove that adhesive. If a piece was out of place, or in the future they needed to disassemble the vessel, it would be quite easy to do with a bit of acetone. The pieces were then joined with a 40% solution of Paraloid B-72.


For the most part, the pieces fit well, but the ceramic was thick and heavy. The bottom pieces slipped a little when I added the higher pieces, so I had to bandage the vessel and continually check to make sure the joins were correct. I also had to use more Paraloid B-72 to cover the entire edge. This meant that excess adhesive was squeezed out when the joins were very close. After it dried, I removed the excess adhesive with acetone-soaked cotton swabs.

Several gaps remain, particularly around the rim. The vessel could have had a spout at one point, which would have easily broken off. Fortunately, these holes are small and do not affect the structural stability of the vessel. Two of the pieces do not belong to this pot, both a slightly different color than this pot. One is made from a much lighter and more porous ceramic. The other is smoother and thinner. During the Seleucia excavation, they accidentally got placed with the wrong vessel.


It was decided that this would be a good pot to practice fills. The lowest large hole, irregularly shaped (visible in the top left and bottom right images), was chosen. I placed a piece of dental wax over the loss area inside the bowl to support the plaster during filling. To do this, I cut a square of wax, then heated it to make it workable. My hands were not warm enough, so I placed it in hot water. I could have also used a hair dryer if I wanted it even warmer and softer. I then placed it inside the vessel and pressed it into the ceramic. I pushed the edges of wax hard to stick to the rough ceramic to get a good seal around all the edges.

The vessel was then placed on its side so that the hole was horizontal. I then filled it with plaster made with deionized water. The dry plaster was added to some water until it started to mound up, then mixed until it reached the correct consistency. It needed to be wet enough to work with, but thick enough to build up, like frosting. I dabbed wet plaster into the loss along the edges and undercuts, where it might have been hard to fill if I had just poured the plaster. After the initial layer, I mounded up the plaster with a spatula. I needed to work fast as the plaster dried surprisingly quickly, and it was set before I finished placing all the plaster into the fill. Even so, my fill was fairly good, though a higher fill would have been preferable. It was just proud of the ceramic, but I could have mounded up more plaster. Its easier to take away excess plaster than it is to fill in depressions and pockets.


After drying overnight, I carved down the fill to the level of the vessel. I first used a flat spatula and scalpel. The plaster scraped away fairly easily, though it was a bit difficult getting to the same level across the entire fill. After I got down, I used sandpaper to smooth the plaster. I removed a little plaster around the edges of the fills to simulate cracks around a sherd. This undercutting also made the piece look better in the spot where the fill was too low. The plaster was then sealed with 20% Paraloid B-72.

I painted the plaster with watered down acrylic paint fill to blend in better. I made a small piece of plaster to test the colors on. I used titanium white, yellow ochre, raw sienna, burnt umber, and raw umber, trying to match the general beige color of the ceramic. I wanted it to match the background color so that it would not be jarring or distracting, but I wanted it to be very recognizable as a fake fill.


I used several layers, moving from lighter to darker shades. The first layers were very watery, to get the basic tone of the ceramic. Upper layers were more pigmented, to the correct shading. The first few layers did not stick well to the sealed plaster, so there were water marks and visible brush strokes, though these were covered in later layers applied with a dabbing motion. Because I did not mix up enough at first, I had to keep mixing the paints for each layer. This meant that some layers were slightly more yellow, others more grey. They created an effect that works well for this ceramic. I probably should have made the color a little lighter; it is easier to work up from a light base than cover a dark one. Suzanne also told me after the fact that acrylic paints often dry darker and cooler than when wet. Because the plaster was sealed in Paraloid B-72, I could wash off the paint with water and start over if it was needed. In the end, the fill had the same basic tone as the rest of the original ceramic, but it is clearly a fill.


Wednesday, July 17, 2013

Greco-Roman Sandal

I cleaned a Greco-Roman sandal which was excavated from Karanis, Egypt. The straps were missing, and only the left sole remains. However, it is in fairly good condition.


Left: top of sandal. Right: bottom of sandal, before conservation.

It was made from woven raffia, a type of fibrous palm. The long pieces were split into six sections at the edges and woven into an intricate border. Most sandals darken over time due to oxidation and deterioration, but this one is still light gold, close to how it would have appeared in antiquity. A knot in the middle and two weaker areas on the edges show where the toe thong would have gone. The bottom of the sole is more damaged than the top, with dry and cracking palms. Some of the bottom-most layer of raffia is damaged or missing.

First, I brushed off the loose soil. I used a small vacuum, with the suction turned down low and gauze placed over the opening. I brushed from the center of the sandal to the edges, pushing the soil toward the vacuum. Not too much that came off with this method, as it had previously been brushed off.

To clean off the excess dirt, embedded from when it was buried in Karanis, Egypt, I used a 1:1 solution of ethanol and deionized water. I made small cotton swabs and shaped them either fat, for the flat sections, or pointed, for the edges. I moistened the swabs in the solution, then blotted it on paper towel. I wanted them to be just slightly damp, as I did not want to get the sandal wet. That would have caused more damage than good.

I gently rolled the cotton along the fibers. The idea is to pick up the dirt by rolling over it and lifting it off, rather than wipe and potentially work it into the material. I had to go over several places a couple times before the soil would come away.


I had to let the area dry and rest before returning, to make sure I was not keeping the organic material damp. There were some areas on the back that I could not clean very well, as they were deteriorated or detached. Too much motion would have damaged these areas more. The hardest part was the border. The dirt trapped in between the weaves was not being picked up by the cotton swabs. I had to use a small needle and brush to remove the soil there.

In the end, most of the dirt was removed, but not all of it. They did not want it to be perfect. It still looks worn and old, but it is brighter and cleaner now.


Left: front, after conservation. Right: bottom.

Wednesday, June 12, 2013

BTA Treatment of Bronze Figurine

I finished treating the Greco-Roman bronze figurine of a bear or wolf on top of a man. I scraped off all the active corrosion, getting as close as possible to the copper but not scratching it. The worst places were underneath the animal and in the incisions on the man. Unfortunately, it was quite hard to get the scalpel into these locations. Although I was able to remove most of the chlorides, there are probably still some spots of corrosion. It is hard to remove them all by hand, even using a small scalpel and microscope. The corrosion layer that remains is not active, and serves to protect the metal underneath. This layer is green and orange on my figurine, whereas the active corrosion was whitish and light green spots.

Satisfied with the results, I inhibited the bronze figurine to hopefully prevent future corrosion. To do this, I immersed the figurine in a 3% solution of benzotriazole (BTA) in ethanol.

BTA is used to coat industrial copper, just as pipes, to prevent corrosion. There is debate over its usefulness in conservation, as the old copper alloys treated this way generally already have corroded. BTA chemically binds to the surface copper, creating a barrier between the metal and the moisture of the environment, but corrosion underneath can erupt through the coating. However, it does seem to slow down the deterioration.


BTA comes as white, long pellets. In general, BTA is dissolved in water or ethanol at 1-3%. I dissolved 30 grams of BTA in 1000 ml of ethanol. This was done by gradually adding the pellets to the cold ethanol and stirring, but some people heat it and apply it hot to make the entire process faster. The solution can be sprayed or painted on, though the most effective method is to submerge the piece for 24 hours. The conservators I work with chose to use the higher percentage and reduce the time in the bath to just a few hours. In this case, I left the figurine in the BTA for four hours.


I took out the bronze figurine and let it air dry. After this treatment, gloves should be worn when handling the figurine. Occasionally, excess BTA dries on the surface as a white crystal, but that can be brushed off or wiped off with ethanol. The white patch that appeared on mine probably occurred from bleaching the adhesive used to put the accession number on the figurine. Sometimes the copper alloys are coated, such as with wax or lacquer, but the Kelsey's collection is in a stable environment so this step is unnecessary for my piece.


Wednesday, June 5, 2013

Consolidation of Ceramics

Today, I consolidated both the Islamic bowl I have been working on and a second Parthian jug.

The jug is larger and thicker than the other jug I did. I had previously cleaned and desalinated the ceramic. It took a long time to desalinate, over two weeks. There are still some soluble salts in the fabric, but the conductivity plateaued. The jug is unglazed and fairly porous. Although a couple pieces are missing, for the most part it is whole, broken up into two dozen pieces.


I used the 10% solution of Paraloid B-72 in acetone that I had made up last week to consolidate the break edges. Using a small paint brush, I sealed all the edges of these two ceramics, which took several hours total. The Parthian jug was easy. The break edges were wide and relatively cleanly broken. The Islamic bowl was harder. The pieces are quite small, and I only wanted the consolidant on the ceramic, not the glaze. When some went onto the glaze, I cleaned it off with acetone. For the laminated pieces which are just one sided sherds of glaze, I consolidated the non-glazed side.


The Paraloid B-72 dried quickly. Some of the ceramic edges look slightly darker than they were, but otherwise they appear to be the same. They feel slightly smoother now though. The consolidation will prevent the ceramic from soaking in the stronger adhesive that I will use next week to join the objects and will protect the pieces from crumbling. It will also make it easier to take apart next time if someone needs to treat it further.

Monday, June 3, 2013

Cleaning the Islamic Bowl

It has been a long time since I last posted, but I have been doing the same project since February. I had a six week break when the conservators went to Egypt, but even so this one project has taken a very long time. I took apart the Islamic bowl and removed all the old gap fills and plaster. Many of the pieces in the central section were laminated. The front and back of these pieces were stable thanks to the glassy glaze, but the porous ceramic in between deteriorated. This resulted in the ceramic crumbling out, leaving two slivers of glaze. At some point, the front and back pieces were sandwiched together with plaster. I took apart all the pieces, including these sandwiched pieces, and removed the plaster. This resulted in 215 pieces of original ceramic, and perhaps as much as a third of the bowl missing.


Three of the five sections. Top right: the top are the original sherds and the bottom are plaster gap fills. Bottom: the plain gray pieces are the backs of painted sherds which have separated.

After removing all the plaster from these pieces, I then had to remove all the adhesive left on the break edges. There seemed to be a couple types of adhesive. The first was water soluble. When I soaked the pieces in warm water to remove the plaster, this adhesive easily dissolved. I just had to brush the break edges to remove it all. However, after drying, a white, solid adhesive appeared on many of the pieces when I checked them under a microscope. It could have been swelled and turned milky due to the water, which is why I did not see it before I started cleaning the pieces.

To remove this harder adhesive, I applied a 1:1 solution of ethanol and acetone to the edges with a cotton swab, which turned the white adhesive slightly 'gummy'. Using a microscope, a scalpel, a pick, and a brush, I was able to scrape off the adhesive. It was hard work as it did not want to come off. This stage of the process took up most of the time I have spent working on this bowl. This week, I finally finished.

Next, I need to consolidate the pieces. This involves painting on a 10% solution of Paraloid B-72. The weak adhesive will protect the pieces, sealing them and stopping them from crumbling further. I made up the solution this week to use next week.

Paraloid B-72 comes in solid, clear pellets. I measured out 20 grams of Paraloid and just under 200 ml of acetone. Technically, a 10% solution needs a 1:9 ratio, but Claudia said she tended to measure out a 1:10 ratio because the solvent evaporates and on excavations it is easier to round up. I then wrapped the pellets of Paraloid B-72 in gauze and tied it with thread, creating a bag. This was placed in the jar of acetone so that the bottom touched but the majority was out. By suspending the bag, I did not have to keep shaking or stirring the jar so that the adhesive would not just settle on the bottom. The jar is then left for 24 hours to allow the adhesive to fully dissolve. Next week, it will be ready to use.


 Top left: Measuring out the Paraloid B-72. Top right: Suspending it in acetone. Bottom: Paraloid dissolving in the acetone.


Wednesday, February 13, 2013

Old Repairs on an Islamic Bowl

Last week, I started to work on an Islamic bowl. The bowl had been bought rather than excavated, so little is known about its origins. Worse, the records for the bowl are incomplete. Although we have some slides showing the bowl in pieces and chunks, we do not have an information about the previous treatments and repairs. From what we can tell between the incomplete record card and slides, the acquisition of the bowl was in 1997. It probably came with some old repairs or inpainting, as it was not in individual potsherds in the slides. In 2000, a conservator at the Kelsey pieced together the rest of the potsherds. The treatment was incredibly invasive. Water soluble plaster was used as a gap fill and to cement slivers of loose glaze. The gap fills were painted to blend in with the rest of the decoration. Though the Islamic bowl looks good to those who do not know, its actually quite bad conservation. The pieces are put together poorly, and the glaze is deteriorating. The bowl probably was whole in 2000, but has since broken. It is now in eleven groups and a bag of flakes and slivers.
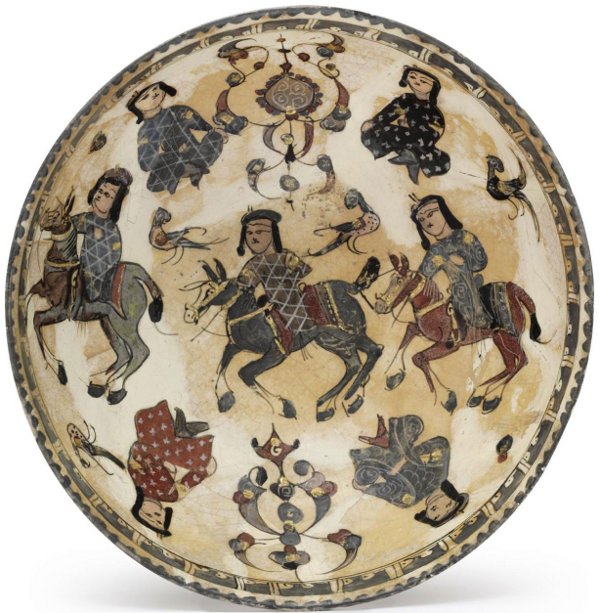
Based on the iconography and colors of the bowl, I would identify this as mina'i ware in the Kashan style from the Seljuk period. That would place the origin of this piece in 13th century Iran. Blue and turquoise were often used in this period, the latter thought to be good luck, and a white or beige ground is typical. Moreover, the large, haloed head and seated or standing figures in patterned clothes without a clear setting is often seen on Kashan wares. The pigeon-like birds, floral swirls, and Quranic inscriptions are also characteristic.

 Seljuk Horsemen, Mina'i pottery bowl, Kashan, c. 1200
To better view the old repairs, I looked at the bowl under ultraviolet light. The synthetic material often used in old ceramic repairs fluoresces in UV light. Although not all the material is visible this way, many of the repaired sections glowed yellow and white. It is possible that cellulose nitrate was used, which typically fluoresces pale yellow and is soluble in acetone, but we still cannot tell what it is.


I had to take apart all the old repairs and clean off the old material so that I can conserve the potsherds. I tested the adhesive, plaster, and paint for solubility. Using cotton swabs on small pieces, I tested warm water, acetone, ethanol, and a solution of half ethanol and half acetone. The effects were minimal. The plaster was soluble in water and the adhesive was soluble in warm water and 1:1 acetone/ethanol, but nothing was very effective on the paint. On one rim section, I dripped 1:1 acetone/ethanol along the joins using a pipet and was able to break apart the pieces. I placed another section of the rim into a bath of warm water which softened the adhesive and allowed the pieces to fall off. The two techniques took approximately the same time, but the water bath also started to dissolve the plaster gap fills. For the rest of the pieces, I placed them in warm water. The bowl then fell apart in the water as the adhesive and plaster dissolved. In the end, I had over 150 pieces, a large number of which are probably entirely plaster gap fills. The next step is to determine which are original and which are remaining plaster pieces.


One rim section alone consisted of 36 pieces, 12 of which turned out to be plaster gap fills. Plaster was also found between the front and back glaze, and supporting damaged pieces. Some of the glaze was also painted over. Much of the center section is plaster and paint, so it will be hard to put back together. This will be a difficult repair. The end product will probably look quite different, and the old repairs might be more pleasing to the eye, but it will be more stable and better in the long run.