Wednesday, January 30, 2013

Tibetan Thangkas

For two weeks, I worked with a visiting conservator at the Museum of Anthropology to prepare works for an upcoming exhibition at the University of Michigan Museum of Art. We worked on 18 Tibetan thangkas, which ranged from two to eight hundred years old. The Canadian conservator I was able to work with specializes in thangkas, routinely traveling to Asia to work on them. She has worked on the Dalai Lama's personal thangkas, and is working with Interpol to study art theft in Bhutan. She was a great conservator to learn from, and very encouraging.

A thangka is a Buddhist painting on silk. These are hung as banners in temples and often kept in monasteries. They usually depict a Buddhist deity, though there are differences in style, pigment, and scene depending on where and when the piece was made. The paint is made from minerals found in the Tibetan mountains held together by yak-hide glue, which makes them very susceptible to water damage. Some of the silk mountings were reused and as important as the painting, such as one with a mounting made from a Ming dynasty imperial robe, which showed the wealth and reverence of the patron. Others were on courser fabrics, which sometimes were entirely cut off or remodeled by the previous owner. These are big, with the thangka ranging from a couple feet high to almost as tall as me.

            A typical Tibetan thangka, with an old            A more Chinese-inspired thangka,               repair to its bottom mounting                       with its original mountings cut off


Thangka with a Ming dynasty silk robe mounting

We mounted these silk paintings onto white linen stretchers so that they can be hung up at the exhibition. Because of the fragility of the pieces, and the fact that someone not trained in conservation will be taking them down, we hand sewed them onto the mountings. The visiting conservator sewed around the actual painting, making sure to only use the holes that were already there so as to not damage them further. I then sewed down the outside edges of the silk mountings. I used invisible stitches on the pieces with original mountings, hiding the thread either in a ridge or stained spot or by only grabbing the lining rather than piercing through. In some cases, the silk mounting was partially or wholly missing. In that case, we had to make a fake section. The fake was not trying to match perfectly or look natural; they were made to show how the original painting would have been displayed. A couple were too fragile to be mounted this way, so I put fabric hinges on them. Velcro will be added to these hinges, and then it can be framed.

 Thangka with a fake mounting

On one piece, the previous owner had rolled up the mountings. The silk had been damaged by rats or insects, and he had created a new channel for the traditional poles by rolling up the remaining mounting. We decided to take out the bottom, as there was so little left that it did not look right, but we left the top. I took out the old stitches. Even though it was a previous repair and not original, we still had to document the process and keep the thread I took out. This thangka is provincial, with a markedly different style, using different colors and materials, than the other thangkas.

Removal of an old repair                            A finished, 'hanging' thangka

For the exhibition statement, see: http://www.umma.umich.edu/view/exhibitions/2013-thangkas.php

For more information about what a thangka is, see: http://en.wikipedia.org/wiki/Thangka

Thursday, January 24, 2013

The Final Piece

The Parthian jug has now been completed! Last time, I put the pieces together and left the adhesive to dry. Today, I cleaned up the vessel, talked it over with Claudia, and took photographs. There were a couple pieces that I was not sure about and thus left out. In consultation with Claudia, we decided that two of them could be fit in. One we estimated was from a hole on the foot of the jug. The piece did not have fitted edges with the whole, but that was the only place big enough for the sherd to go, and the look of the sherd seemed to fit with the surrounding pieces. I used liberal amounts of the Paraloid B-72, which acted like a gap fill to hold the sherd in place.

The other piece was trickier. We thought that it could possibly go in the large hole on the back of the jug, but it was slightly too big. It, too, did not have a perfect fit for surrounding edges, so I had left it out. Now that we thought we had discovered the only place it possibly could go, unless it was part of another pot, it was locked out. The angle was such that there was no way I could fit it in place. This is where the consolidation of the edges helps. Paraloid B-72 is a thermoplastic adhesive, which means that heating it up will loosen it. Between heat and acetone, the resin can be almost entirely removed. Using a hair dryer (so high-tech!), I heated up the piece that I needed to take out and the joins that I wanted to move. I wiggled out the piece that had locked out the one I wanted to put in. This allowed me to start to put the sherd in its place, but it still was too big for the gap. I applied pressure to the sherds, and I heated up some more joins. Using pressure to move the pieces almost imperceptibly, I was able to pop the piece in place. The entire process was about moving the surrounding pieces nanometers or less, but it was the difference between a piece fitting or not.

The first piece I added is the triangle at the bottom, and the locked out piece that I wanted to add is the small trapezoid to the right, dividing the two gaps. Here, it is almost in place, but still popping up because the space was too small.

After putting these sherds in place, I cleaned off the excess adhesive with acetone and photographed the jug. The photographs were put in the digital image database, and the jug was put away. I truly enjoyed this experience. Next time, perhaps I will do a more challenging ceramic.


Thursday, January 17, 2013

Reconstructing the Parthian Jug

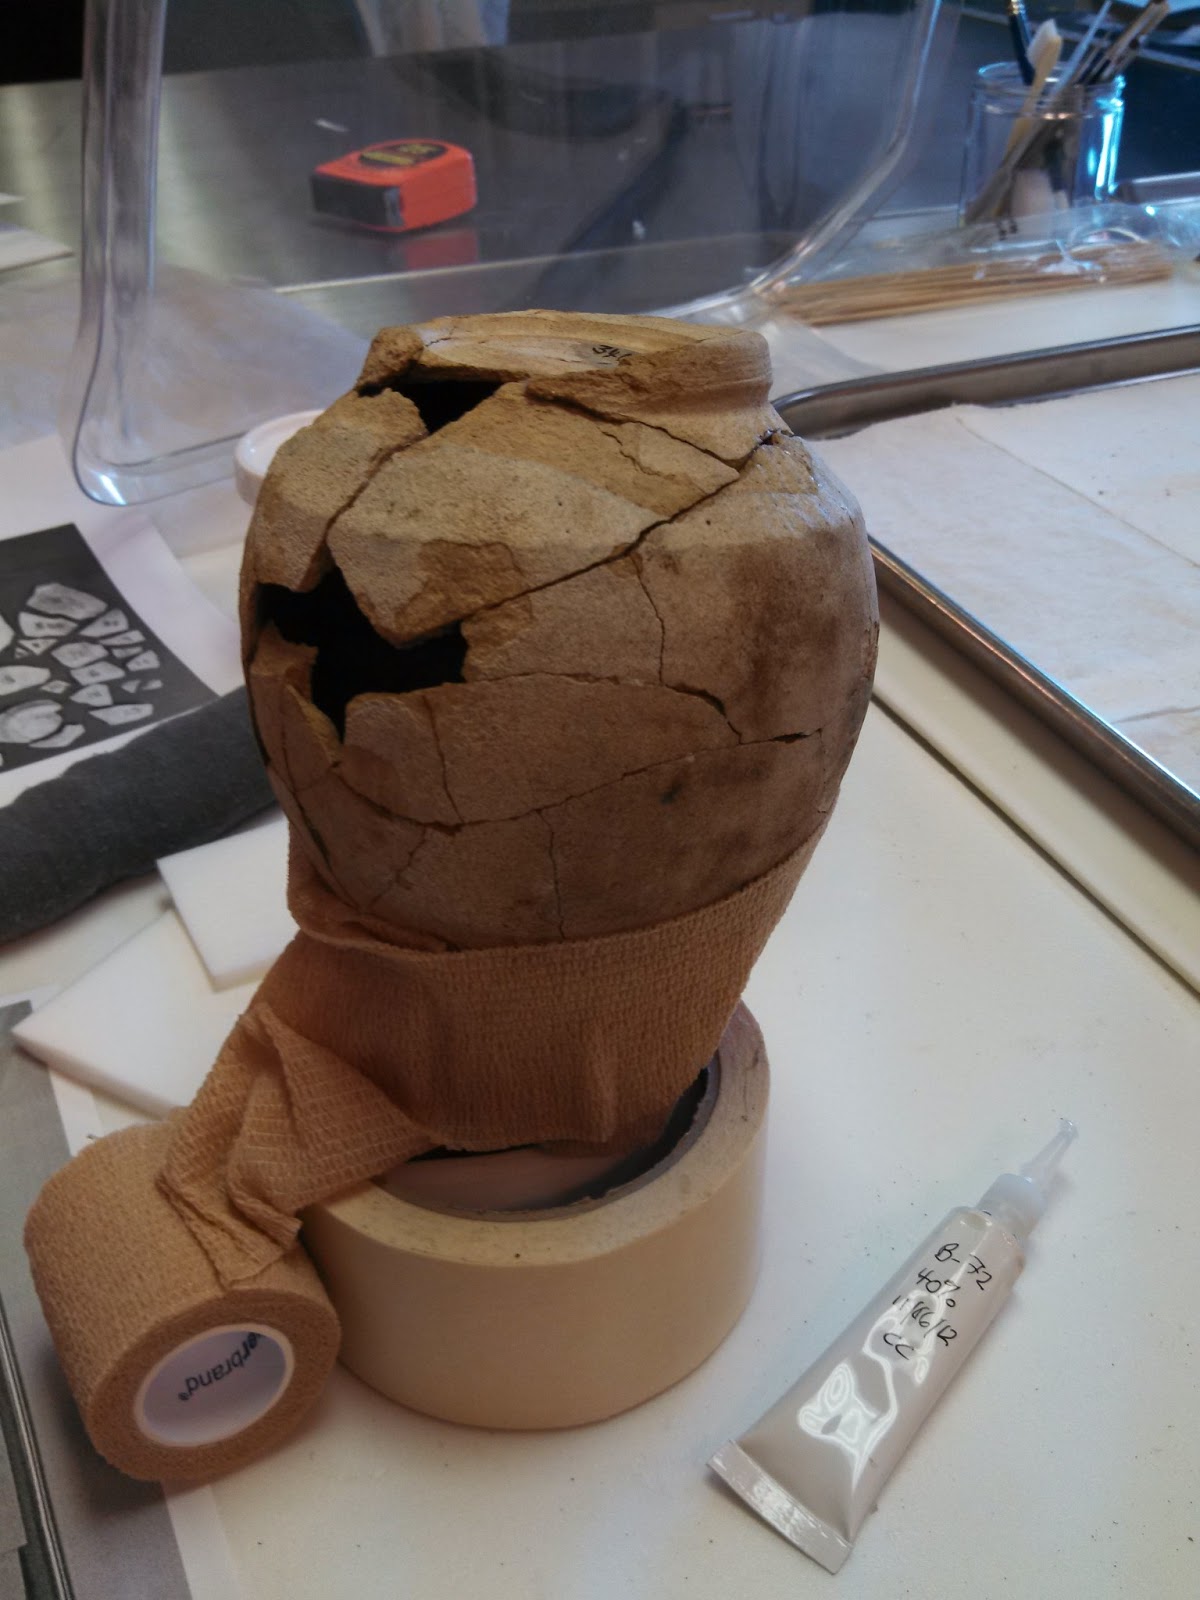
Three weeks after I started working on the Parthian jug, I was finally able to put it back together. I started by making up a plan for the order of joining the pieces. Because there were pieces missing on the bottom and the fabric was weaker, I started at the neck of the jug and worked my way down. One has to pick a side, typically the base, because often gaps will arise and it is better to put the excess space between the pieces at the end, rather than having an awkward or unstable seam in the middle. For this reason also I did not put together pieces independently and then try to join them. This technique of working quickly to reconstruct the entire ceramic at once does not seem to be very common. Instead, conservators will join pieces and let them dry before moving on. This way was quick, it allowed the structure to support itself, and any issues with fit were dealt with before the adhesive was entirely set.

The inversion, and the fact that the rim is entirely missing, meant that I had to create a cushioned support around the neck, which I did by placing it in a ring of tape and padding it with styrofoam. At the bottom, I also used self-adhesive bandages to keep the right amount of pressure on the sherds so that they would not fall outwards before I got the higher pieces in place. As much as possible, I worked in registers so that the piece could support itself as I glued pieces on. As I went higher, the sherds were held together by gravity and the lower pieces.


The adhesive that I used was 40% Paraloid B-72. I placed a thin line along one edge to be joined, then placed the piece. I took it off to check to make sure the adhesive got on both sides, indicating a good connection, then I placed it permanently. I was pleasantly surprised how strong the adhesive was and how quickly it set. Even working at an angle, I did not have to hold the pieces in place once I adhered them. I had used a diluted solution of the same adhesive to consolidate and seal the edges of the pieces. Because of the added layer of consolidation, the sherds did not always feel like they fit exactly together. I also had some minor issues with sherds not wanting to match up perfectly with surrounding pieces when placed, but applying pressure to the sherds already glued together allowed me to gently move the pot into position.


 In the end, it came together. The finished jug has a few gaps on the neck, body, and base, but structurally these probably do not need to be filled. There are also three sherds that I was unable to place. One may not go to this pot, as it is too big to place in any of the gaps. The other two do not have matching edges with any of the remaining pieces, so although I can estimate where they would go, I did not glue them on.


 One of the cool things about reconstructing this pot, besides being able to see its actual shape, is that the shatter pattern let's me guess how the pot was broken. It looks like it was dropped or crushed on its side with the handle almost downward. The damage is particularly bad on the body and base of the jug on the side shown in the second picture below. Overall, the reconstruction was relatively quick and quite fun. I definitely would like to work with ceramics again.


Wednesday, January 9, 2013

Calculation, Consolidation, and Condition Reports

Today, I returned to work on the Parthian pot. The potsherds had been soaked in deionized water for 6 days. Each day, the salt concentration was measured and recorded, and the water was changed. By the last day, the salt concentration had plateaued. Using Unruh's equation for standardizing the conductivity measurements in desalination, κ (adj) = κL/g, where κ is the salt concentration in µS, I calculated that the potsherds stabilized at .7 µS. Getting below 2 µS for κ (adj) is preferable for ceramics. While still wet, the edges of the potsherds were brushed to gently clean them. It is imperative that the edges are clean when I join them.


After drying out, the edges of the potsherds had to be consolidated using Paraloid B-72. The 5% solution which I used has acetone as the solvent. This concentration was already made up, but 10% would have been better for my purposes. With a small paintbrush, I applied several layers of the solution onto the broken edges of the sherds. I used a fume hood during this process because of the acetone. At the end, the edges were slightly darker and felt a little like shiny plastic. Essentially, the fabric is porous and the dilute adhesive is drawn into the capillaries where it then dries and seals off the ceramic. I could actually see it being drawn in and bubbling slightly when air was displaced. This prevents further damage, such as from bad joins, jostling, crumbling, or water. Having this smooth sealant will also help when I piece the pot back together. The layer is thin enough that it will not get in the way of a close join, but will prevent the heavier adhesive from soaking in, which could potentially harm or discolor the ceramic fabric, and will make it easier to take apart and redo if I make a mistake or if it has to be fixed in the future. The consolidation was not necessary, and many conservators do not do this step, but at the Kelsey they feel it is useful.


Lastly, I worked on some condition reports. One of the faculty members is organizing a small display about the excavations at Antioch to be added to the permanent exhibition. The objects that she requested for display have to be checked and mounted by conservators before they can be installed. The pieces she requested included architectural fragments and archival material. For the archival material, Claudia used mylar strips to hold down some materials, and Japanese rice paper and wheat starch paste to mount others. The stone pieces I checked were all stable and did not require any additional treatment before being displayed, but the chunk of mosaic has a piece of mortar loose. In the picture below, it is a small piece below the yellow tessera on the left. Stone is fairly inert and does not require much conservation. However, that does not mean that they should not be monitored periodically. I documented this issue and took photographs today. Soon, I will stabilize the mosaic by consolidating the mortar.